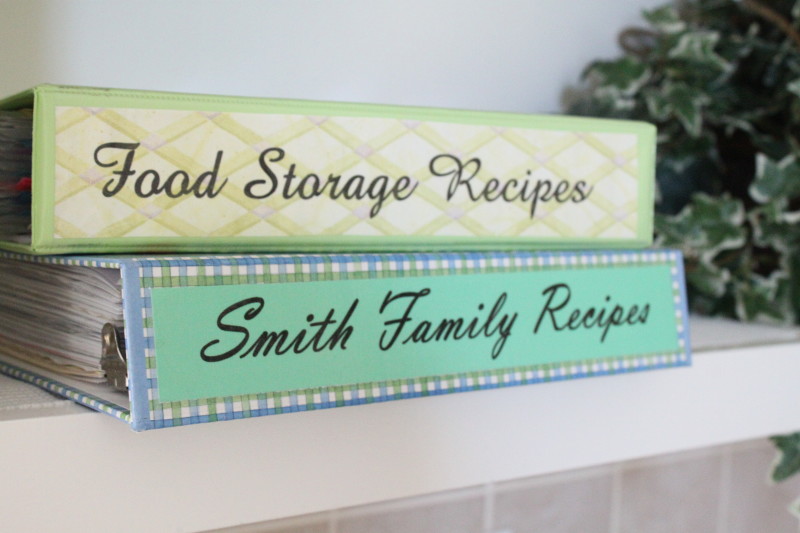
Want to create your own food storage cookbook??
This 12 step plan is here to show you how!
( P.S. -Be sure that you’ve first watched the introductory
videos found in “Catch the Vision” that explain the system! )
SUPPLIES YOU WILL NEED
- wide tab dividers
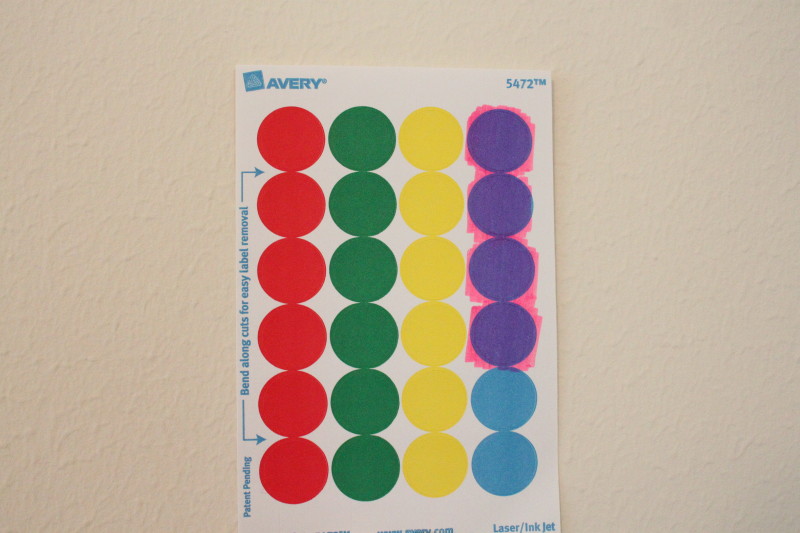
- large color coding dots
- small color coding dots
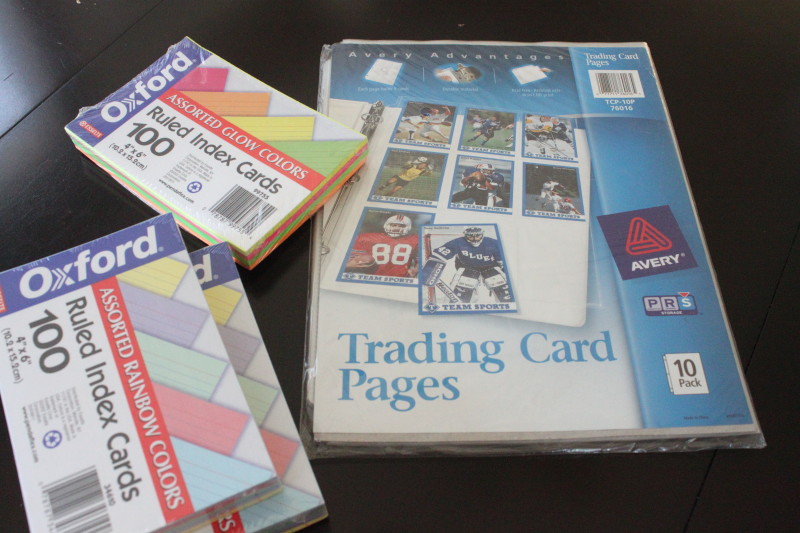
- 4 x 6 plastic photo pages
- heavy duty plastic page protectors (my choice because I want this cookbook to last!)
- 4x 6 white index cards
- a Mead Organizher notebook (I found mine at Target)
- Three binders: one large heavy duty one for your recipes, another for your planning binder and one more for your tracking binder
- trading card plastic pages
- 4 x 6 colored index cards the same colors as the colors you’ve chosen for your food categories
Divide the big binder into desired food categories. Each category needs it’s own color. In my recipe binder I’ve coded my food categories as follows:
Yellow = Chicken
Green = Vegetarian
Purple = Soups
Red = Beef
Blue = Pork
Hot Pink = Seafood
Step one: Choose your favorite recipes.
I’m working hard to post all of the recipes I’ve used in my own book and think you’ll like too. You’ll find a comprehensive list of these in my recipe index with each one having the option of being printed, recipe only, at the top of each post. When ready to print, un-check the “fit to page” option to print a 4 x 6 size. Some of the recipes are too lengthy to fit on a 4 x 6 card, so I’ve called these pdfs “recipe pages” and they print to a full page 8 x 10 size.
In addition to the recipes I’ve posted, take a look at the books & links page for other specific books and sites I’d suggest in finding other recipes to fit your family’s tastes.
A third suggestion is to look over the recipes your family already uses to see if they can be used by substituting storable ingredients. There’s a knack in figuring out if a recipe will work like this or not. Soups (generally) are very easy to convert over. Other recipes might have certain ingredients that can be swapped out still allowing them to “work”. For example, the texture of crunchy celery can be substituted sometimes by using canned water chestnuts. So with some creativity, there might be ways to re-create the meals you’re used to eating. To help you with this, I’d suggest reading Jennine’s 4 part food storage guide (found in July 2012’s archives) in which she details a large spectrum of ingredients and how they are “best” stored, and in this case substituted.
A word about variety. To me having variety in my plan is a high priority. Personally I can’t stand eating the same meal twice in a month, I have to have different tastes and textures to keep mealtime interesting. Maybe you don’t want or need as many recipes, just design it however you like, however I would ask you to consider how much variety you currently have in your meals — chances are (even without thinking about it) you are accustomed to quite a bit of variety as it is. Besides having variety around for taste I think it’s important to keep variety going for the sake of the cook who is preparing the food. How boring it would be (for me) to have to cook the same things over and over and over! Okay, enough said.
Print out the recipes you want to use in your plan, trim them to fit and tape them on either 4 x 6 index cards or full pages of white card stock. If you need a full page (because the recipe is a lengthy one) I’ve used plain sheets of white cardstock to tape the recipes to. With those you’ll need to trim the cardstock’s side down by an inch or two so that it sizes nicely in your binder. Use 4 x 6 photo pages (for your cards) or plastic page protectors (for full page recipes) to organize and protect it all. Lastly, trim the plastic side edges of the photo pages and plastic sleeves by about an inch so that they don’t get in the way of seeing your food category tabs.


Step two: assign each of your recipes to their “storage groups” using small color coded dots placed at the top right hand corner of recipe card/page. This is the key that I used based on the storage groups I decided that I wanted in my plan:
Green dot= Long term meal –meals using ingredients that store for long periods of time ie: grains, freeze dried or dehydrated foods, etc.
Red dot= 3 month meal –these are meals made with ingredients that you normally eat. These meals would include things like fresh produce that stores well, dairy products and ingredients that can be frozen.
Blue dot= Pantry Meal — these are my food storage “convenience meals” where everything is already pre- measured, bagged and ready to go. These meals are the way I plan to get dinner served fast when I don’t have time to cook.
Yellow dot= Sun Oven — these meals can be cooked using a sun oven if no electricity were available. Solar cooking is excellent when conditions allow it because it allows me to “cook for free” without using my stores of fuel, however because it’s dependent on weather conditions I need this group of meals to be “flagged” so I can be prepared to cook or (if needed) trade it out for another day because the weather is bad.
NOTE ~ be sure that you are coding your recipes according to what you are willing to store and cook. I’ve included my own Recipe Index Master in the planning pages section for you to use as a guide if you wish but just be sure that you are coding your recipes to meet the needs of your own family. Some recipes require a lot of work and specialized ingredients or tools to make them work as long term recipes. How adventurous are you in the kitchen? What is your family’s food storage budget looking like? Only you know best, so be sure to read through your recipes closely before coding them as a do-able long term, 3 month, pantry or sun oven recipes.
Step 3: Now, with all of your recipes in protective pages, label each recipe within each food category with a large color coded dot and give it a number. For example as pictured above, “Chicken Stuffed Shells” has a yellow dot and it’s number is #6, because it’s the 6th recipe in my chicken category.
Step 4: Create a Recipe Index planning page by using the color code information you have recorded with the small dots on each of your recipe cards. A copy of mine can be found under the “planning pages” section. Put this index into your planning binder in plastic sleeves.
Step 5: Pull out the calendar planning pages from the Mead Organizher and if you are wanting to include a 3 month plan, make extra copies to use for that. I really like these specific calendar pages because with the way they are laid out they allow me to plan a breakfast meal plan, daily bread and main meal. Right now we are only focusing on main meals, but of course the rest is on it’s way!
After making copies if needed, place these pages in plastic protective pages inside your planning binder under the tabs they belong under (“Long term” or “3 month”) and you’re ready to start calendaring your meals!
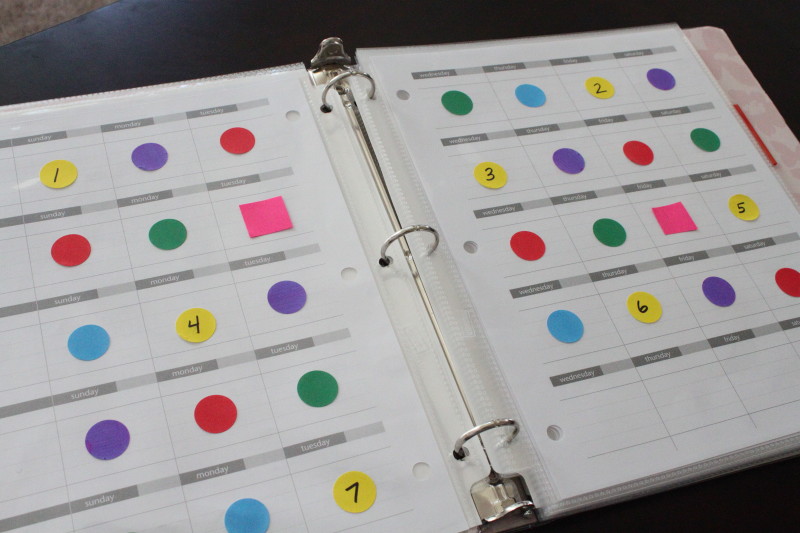
Step 6: Decide on a dot pattern and start calendaring your food categories.
Depending on your chosen food categories and the number of recipes you have in each, you’ll notice that you might have a lot of recipes in some categories and not so many in others. This is the dot pattern I used to help me in calendaring out my categories. I don’t have many recipes using Pork or Seafood while the other categories are all pretty equal with quite a number of recipes. I’m especially low on the seafood recipes, so with this in mind I alternated my pork (blue) and seafood (hot pink) recipes so they don’t pop up as often, the seafood coming up even less often than the pork.
Once you have a pattern decided on, start laying down your stickers. For my hot pink stickers I used hot pink sticky notes cut into squares where the adhesive is.
At the beginning of each plan I started laying down stickers on the Monday square to get a few extra days in. Through the middle portion of the plan I ended every month on the last Tuesday on the calendar and began the next one on the first Wednesday just to keep it flowing on a day to day schedule. On the last month of the plan I laid down stickers through to Saturday to get as many meals in as possible. Does it add up to exactly 365 days worth on my one year plan? I’m not sure but it’s close enough.
Step 7: Add specific recipe numbers to the color coded plan.
Now you’re ready to add specific recipe numbers to your calendared plan! If you’re making up both a long term plan and a 3 month plan, look to your recipe index to see which one has the greater amount of recipes and start numbering that plan first. In my case nearly all of my recipes were long term so that was the plan that I numbered first.
Now that you know which plan you’re starting with we’re going to label just one food category at a time. In this case it’s our chicken recipes in our long term plan.
First, look at your Recipe Index Master List in the chicken category / long term recipes and note if there are any skips in the sequence of recipe numbers. On my list I had to remember to skip the number 22 because that recipe was a 3 month only recipe while all the rest were long term recipes. Write this down (the numbers that you need to skip) and take that note with you to the planning calendar.
Go ahead and start numbering your yellow stickers, being careful to skip the numbers that you’ve noted to remember to skip.
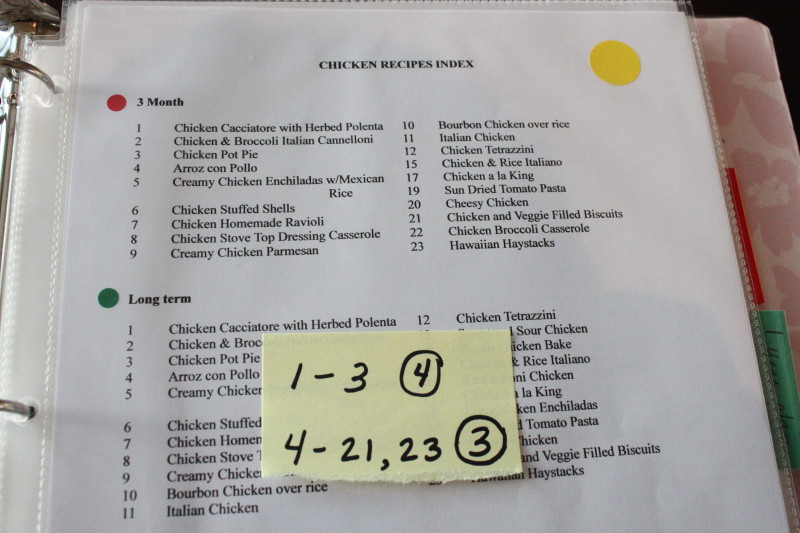
Great! You’ve finished numbering your plan with all of your long term chicken recipes. Now save yourself some big work later and make a tally of how many times each recipe was used as you counted through. It’s pretty easy to do at this point if you quickly jot down how many times you counted through each category’s numbers. Be sure to make it clear *of the numbers you skipped* so that you don’t accidentally count recipes that weren’t used.
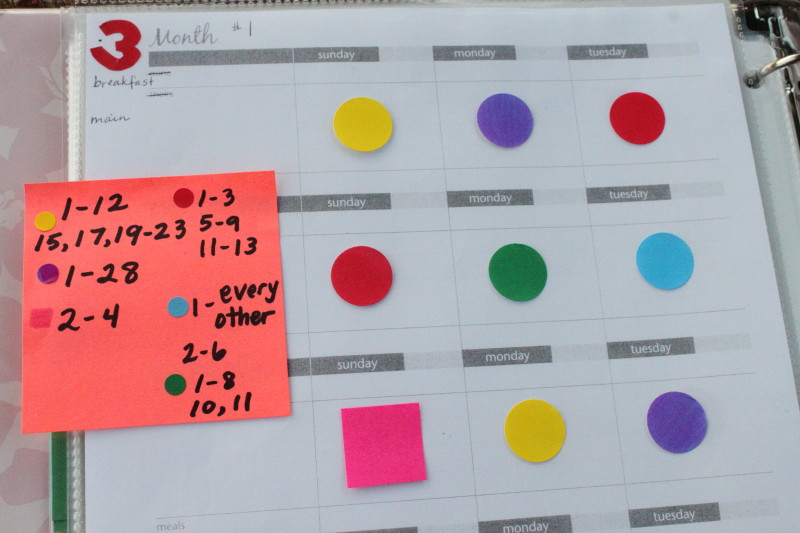
To keep my tally notes clear for myself I kept the totals for my long term recipes on yellow sticky notes while for my next plan, my 3 month plan, I wrote my recipe totals on bright orange notes.
Continue throughout the remaining food categories in the same way, keeping notes of the numbers skipped, numbering your stickers and then placing your totals where you’ll remember them (as you can see above, I put them right on top of my index pages) until you have gone through all the food categories in your plan.
**One note here: in customizing our own family’s plan I realized that it would be a real comfort to have one meal, pizza, regularly twice a month. If you’re wondering how in the world you make pizza with food storage ingredients see my Oct. 5th post here. Anyway, that was something I decided to build into our plan. Pizza is number 1 (isn’t it always?) on my pork recipe list. So, in order to make this happen evenly on our calendar when it was pork’s turn to get numbered, I first went through numbering my #1’s twice a month, alternating every other pork recipe which for me worked out pretty close to twice a month. I then went back and numbered the remaining pork recipe numbers in the blank blue stickers that were left.
Step 8: Move on to numbering your next plan if you have one. In my case, this was my 3 month plan.
Okay, this is where all this numbering can get a little tricky. It’s super important that you keep good notes. With this plan, atleast in my case, there were a lot of skips in the sequence of recipe numbers to keep straight. The easiest thing that helped was to keep my notes all on one piece of paper with the color coded food categories perfectly clear. And since I had a few extra dots laying around I used some of those in my notes to indicate which food category I was talking about. As you look at my yellow post it note below, the circled number indicates how many times those recipes were calendared.
Here is my completed note with all the categories ready to go
Carefully fill in the numbers on your second plan’s calendar, keeping tally notes just like we previously did after each category is counted out.
You should then have notes on both plans as to how many times each recipe is used. Do not throw away these notes! You’ll refer back to them as you’re pulling together your ingredient summaries since you’ll need to know how many times a specific recipes is made with 3 month ingredients vs. long term ingredients. See my example of my own ingredients summaries in the planning pages section to see how this is going to change what you are storing within each recipe.
Step 9: Now it’s time to add some of the absolute best information to our calendared food storage plan! In this step we’re going to build an indication signal to ourself as to which recipes are pantry “fast food” recipes and which are geared to be solar oven recipes (the storage groups I’ve decided to build into my plan, your plan could be different).
Why is it so important to note this information on our calendar? Imagine this: you’re in the midst of having to use your food storage while at the same time you’re faced with taking care of a sick family member (or insert your own “low on time” catastrophe). There’s no way after a full day of taking care of sick kids that you can pull a meal together from scratch on top of it all. What will you do? You still have to cook! Well, with this plan in place, you’re able to simply look at your calendar and trade the dot that was supposed to be the meal of the day with a “signaled” dot that tells you it’s a quick pantry meal. Inventory wise nothing is altered in your plan, the family gets fed more easily that night and life goes on. Likewise, imagine you come upon a week when there’s no electricity. Again, you’re able to easily adapt to the situation without increased stress where there’s already enough stress as it is. That’s the beauty of putting these signals right into your calendar and why this extra step will be worth it in the end.
Back to work…
Again, you need to make notes for yourself (using your Recipe Index) as to which recipes are assigned as pantry recipes. The colored dots on my blue sticky note below helps me to know which food category I’m talking about as I made the notes so that I don’t get it all mixed up once I’m trying to mark my calendar.
Mark these recipes with a small blue dot. Repeat the process with your Sun oven recipes (if you’ve decided to use them in your plan) and mark these recipes with a small yellow dot.
I made these blue and yellow dots brighter and more visible on the large dots by marking a plain white sticker with a blue / yellow highlighter marker and then cutting them out into square dots which I placed on my recipe stickers. You could also find some fun (small) sparkly stickers at the craft store, just so that they’re different and noticible.
Step 10: Add up your numbered recipes in each category (for both plans if that’s what your doing)and create your own Recipe Calculations Index. Now that you know how many times each recipe will be used in your plan you can calculate the ingredient summaries that will be placed on the back of each recipe card. Keep your notes here –don’t throw them away–for use when your putting together your tracking binder. Examples of both of these pages are found in the planning pages section. There are also a couple of conversion charts there for you that I have found helpful.
Step 11: Using the totals you come up with on your individual ingredient summaries, tally up your Master Food Storage Inventory List.
The easiest way to do this is to keep a running tally as you go along, one ingredient summary at a time, adding up each individual ingredient as you go. Remember to be super careful with your math and conversions as you work.
Step 12: Creating a tracking binder
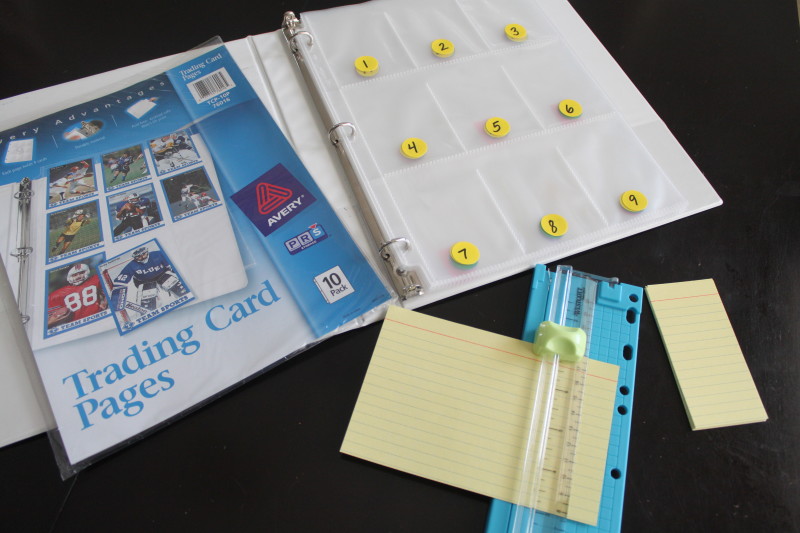
This is what you’ll need to do to create a tracking binder. Label the pocketed trading card pages with large colored dots numbered according to the recipes you have in each of your separate food categories. The trading card page shown here uses yellow dots so it’s where I’ll be tracking my chicken recipes along with the yellow index cards.
Then cut 4 x 6 index cards into thirds (each one will measure 2 inches — if you have a paper cutter you’ll be happy to have it!) . Now according to your notes (remember I told you to keep your notes from your calendaring in step 9?) combined with the information you have in your recipe calculations page you can start filling up those pockets with the cards they each require. In my tracking binder I’ve circled my 3 month recipes (got the information from my notes!) in red and my long term recipes in green so that I know which is which.
In this example recipe number 7, Chicken Ravioi, is going to be made four times total in my entire plan. Three of the times it will be made as a long term meal and once as a 3 month meal. The reason it’s important to distinguish between 3 month and long term here is because there is a slight difference in the types of ingredients for each.
Well, there you go! I hope this has been helpful. It may seem like a lot of work but for me the peace of mind I get from having a solid and organized plan in place makes it all worth it!!










If you don’t mind me asking, How do you implement this into your everyday eating? Do you follow your year long calendar using your long term storage items every day and just replenish as you go? Do you just follow the 3 month plan repeatedly and only use the long term meals for emergencies? Do you constantly change the calendar to reflect new/added recipes? Thank you so much!
Right now this is simply the schedule we would keep if we ever had to use our food storage. Other than just having the inventory, it would go into effect at that point. To keep everything rotated I bake a lot and use many of the pantry meals mostly (which include long term ingredients), and every once in a while I’ll make a full blown 100% food storage meal just to do it, or if something needs to get used. I did a post about my schedule here, but the calendar itself is for the purpose of knowing how much of everything I would need to feed my family (100% food storage) for __ number of days/months. Also, my recipes have been swapped out a lot since I first started it. Every time I find a better recipe I’d get rid of one of the ones we didn’t like so much and usually most of the base ingredients are already in my storage so it just means adding a little more of something or adding one or two items that aren’t there (x however many times I’m planning to make it). One of the biggest problems I’ve seen with people’s food storage plans is that they really have no sense as to how long their food will last or which recipe it can be used for, so that’s the purpose of the planning portion here. I’d need something to tell me “on this day you’re making __.” Of course the days could be swapped out as well, but it would keep me on course.
Do you know a site to make your own monthly pages? I just can’t see spending $10.00 to copy some images.
The cheapest idea I can think of is just to draw it out, which would work, it just might not be seamless looking. No matter though, you’ll still have the foundation of the system which will serve it’s purpose.
Hi! I just found this site, and I love it! I just want to say that for all things “calendar” I use Printfree.com (I never knew how often I needed calendar pages, until I found them a couple of years ago. lol)
Cool! Thank you for sharing that! I’ll have to go check it out.
Here are two .pdfs to print the two-page monthly calendar as is illustrated in your post:
http://donnayoung.org/fi14a/household-fs-f/2p-block-planner/month1.pdf
and
http://donnayoung.org/fi14a/household-fs-f/2p-block-planner/month1-2.pdf
It would let you fill in the month and has room for notes.
Love your site–you are a blessing!
Fantastic! Thank you SO much for sharing those! 🙂
Wow. Absolutely amazing. We are a family of 6 on a tight budget. I’m always looking for ways to feed my family and build our food storage. Your system allows me to plan all my meals, see the amount needed for everything, and be able to purchase it in bulk when its on sale. Can’t wait to see what you have next.
Thanks for your kind words! For me this system makes it “tangible” — I can make it happen since I know exactly how much I need of everything. I’m glad it’s going to help you too! 🙂
[…] you have food storage, what recipes will make that delicious homemade bread? Click on this link to Create Your Own Food Storage Recipe Book at home with your own printer and […]
I’ve been organizing my food storage in a very similar way for quite a long time. But I’m always looking for more recipes to add variety to my list of meals. Thanks for your ideas. i have a couple of bean soup recipes that are delicious and a zuppa toscana soup that my family absolutely loves! You can make everything in these soups long term.
Sorry Sharon, I’d meant to reply back yesterday but got busy. Thanks for the note! I’d LOVE it if you wanted to share your favorite soup recipes so I can pass them along. Our family of course doesn’t eat a lot of beans so a favorite from someone else’s kitchen I’m sure would be greatly appreciated! Send them to myfoodstoragecookbook@hotmail.com and I can get them posted on the blog.
[…] has VIDEOS you can watch and instructions on how you can make a Food Storage BOOK just like […]
Very excited to start this process…thank you for the wonderful information.
My pleasure, Debra. Thanks for your note 🙂
Thank you for taking the time carefully document every step. This will be an immense help to us as we are just getting started.
You’re very welcome. I’m glad it will be helpful!
Wow, what organization, impressive!!:0)
Thank you, I just found your page and am so excited to try out your system! When it comes to getting my food storage organized I get overwhelmed, but now I have a teacher with step by step directions so I can help feed my family!!!!! 🙂